


I recently dug out an old Raspberry Pi and was surprised to find it still working. I couldn't remember exactly what model it is so I ran lshw on it and discovered that I have a Raspberry Pi 1 Model B Rev 2, a single-core ARMv6 device. I christened it "Mucor" and decided to install Void Linux on it, since Void is lightweight and has ARMv6 Raspberry Pi builds available.
I wrote this guide based on the experience. It takes a simple approach, using pre-built live images, and is easy to follow from either Windows or Linux. It assumes some general familiarity with Linux and the command line, but I try not to assume too much. I'm also working on a Void Linux Cheatsheet that may be helpful to look at.
§Requirements
This guide requires an SD card with at least 2GB of storage. It's written for an ARMv6 Raspberry Pi 1, but I imagine the same basic approach would work for many similar platforms.
§Preparing the Media
Void offers two different approaches to installation — live images and ROOTFS tarballs. This guide will cover the live image approach. I'll be using the ARMv6 build, and for simplicity glibc — musl is more lightweight but we have enough space for either.
Insert the SD card you want to use. The next steps depend on what platform you're on.
§Flashing the Image
§Linux
Determine the device name of your SD card. In this guide mine is at /dev/sdh. Be sure to change this in the following commands.
# Download the image
curl https://repo-default.voidlinux.org/live/current/void-rpi-armv6l-20240314.img.xz -o void-rpi-armv6l-20240314.img.xz

# Decompress the image
unxz void-rpi-armv6l-20240314.img.xz

# Flash the image to your SD card
dd if=void-rpi-armv6l-20240314.img of=/dev/sdh bs=1M status=progress
Jump to Free space below to continue.
§Windows
First, download the live image.
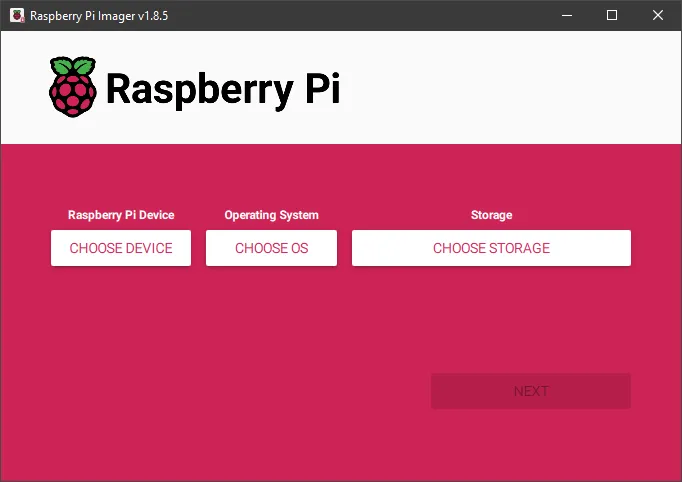
Under Windows you can use multiple tools to flash the image to your SD card, such as Rufus, imageUSB and Raspberry Pi Imager. Raspberry Pi Imager can use xz-compressed images directly, so we'll use that. Download and install Raspberry Pi Imager, then open it:
Ignore the "Choose Device" button. Click "Choose OS", then scroll to the bottom of the list and select "Use Custom":
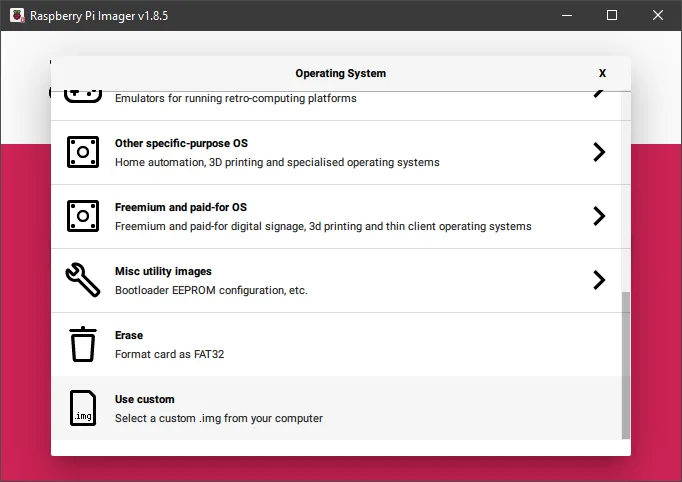
From here, select the image file you downloaded earlier, named void-rpi-armv6l-20240314.img.xz. After this you'll be returned to the main inteface. Click "Choose Storage". You'll be presented with a list of removable drives you can flash:
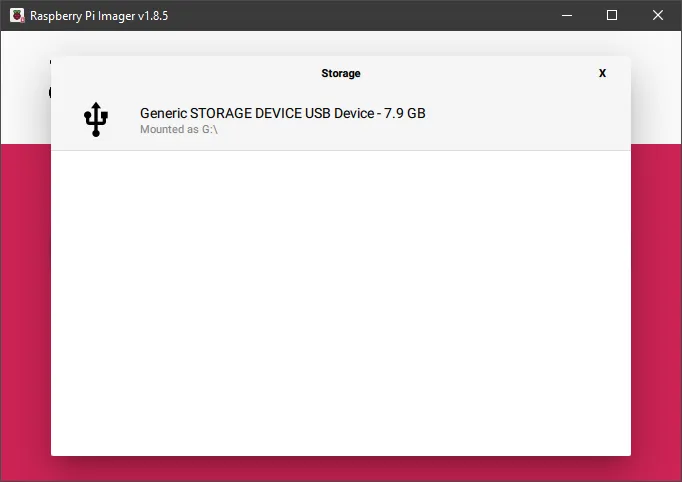
Pick the SD card you want to use. You'll be returned to the main interface again. From here, hit "Next". You'll be prompted to apply OS settings:
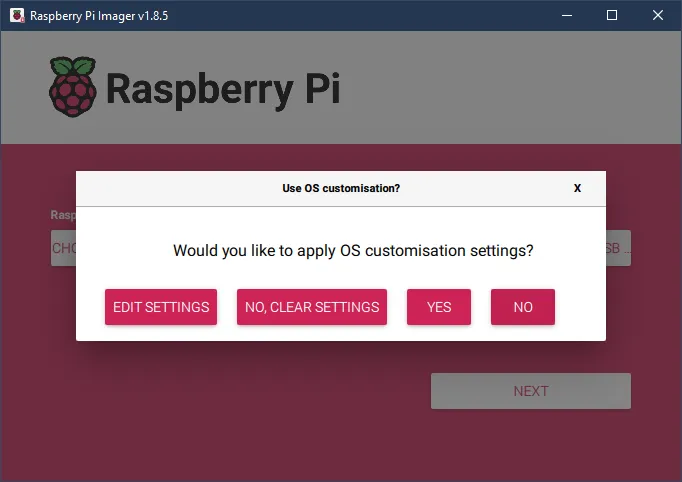
Hit "No" here. You'll then be warned that all data on the SD card will be erased. Hit "Yes" to continue. The writing process will begin, then the card will be verified. If all goes well you'll see the following notice:
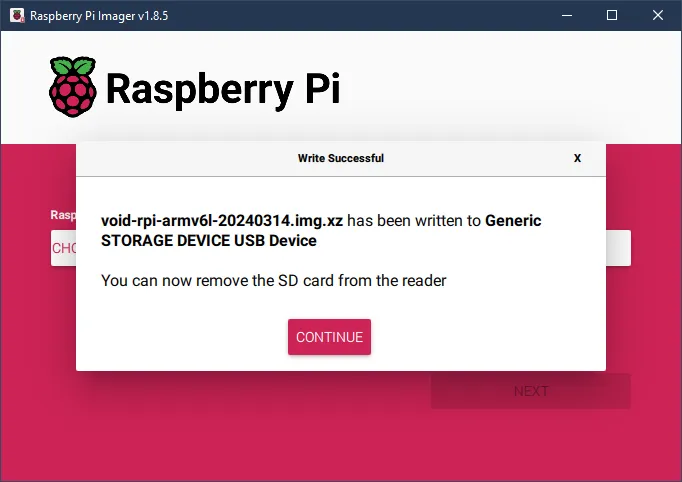
Click continue. Raspberry Pi Imager automatically ejects the SD card, but we aren't done with it. Remove and re-insert the SD card.
§Free Space
When using the live image method, you'll have unallocated free space left on your SD card if it's larger than 2GB. If your card is only 2GB, skip to Working With the System. We could expand the existing root partition but I prefer to just create a new partition to fill the space. It's simpler and less fiddly, and we can use bind mounts to preserve space on the root partition.
§Linux
Run cfdisk /dev/sdh:
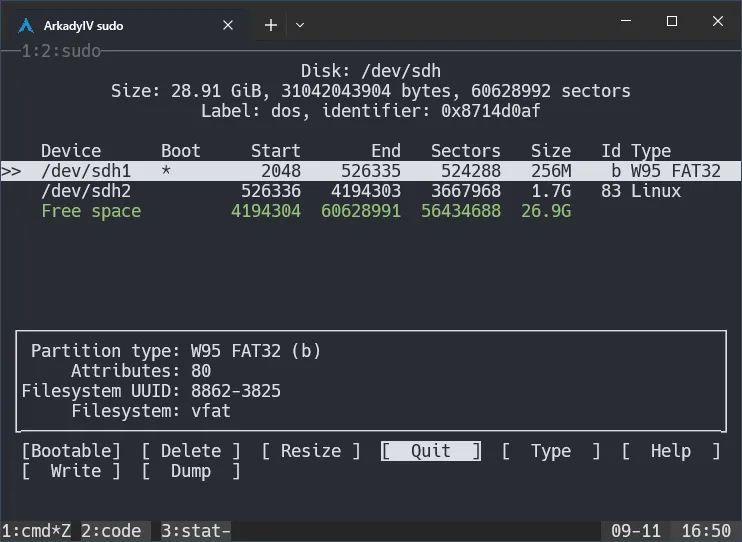
Highlight "Free space" and hit Enter to create a new partition:
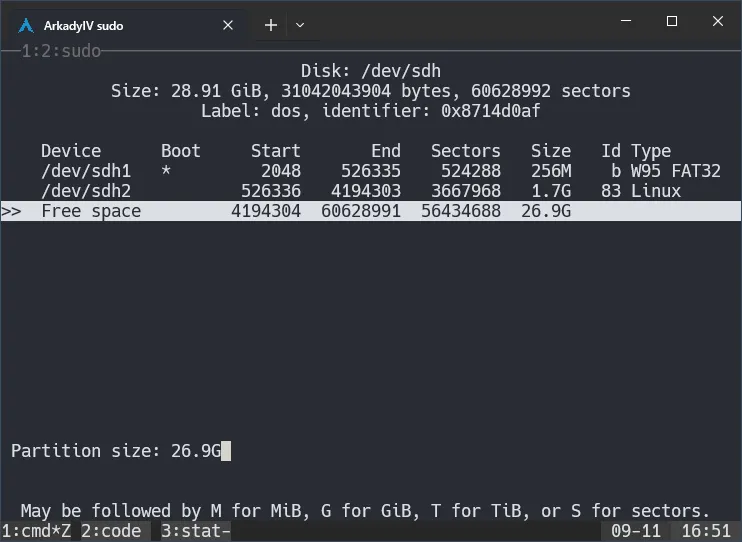
You'll be asked for the size of the new partition, and then whether it should be primary or extended. The defaults should be fine, so just hit Enter for both questions. Afterwords you'll be returned to the main interface. Use the right arrow key to highlight "Write" at the bottom of the interface:
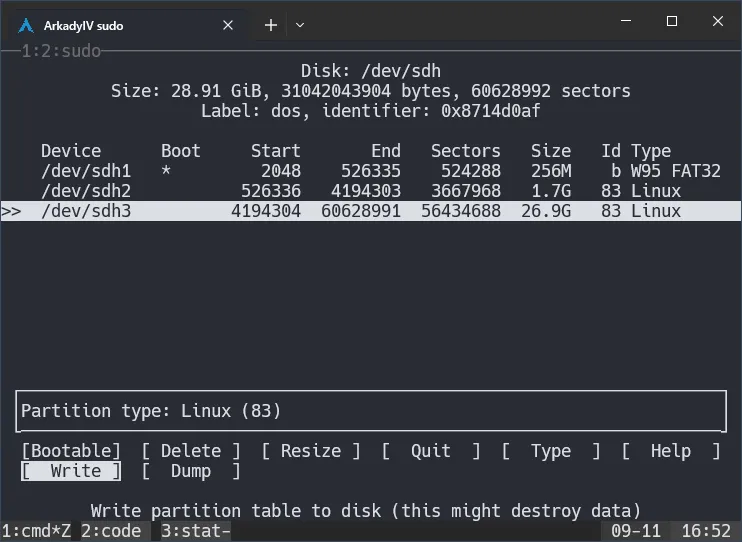
Hit Enter to write the partition table. You'll be asked to confirm this. Type "yes" then hit Enter to commit your changes to disk. If all goes well you'll see this:
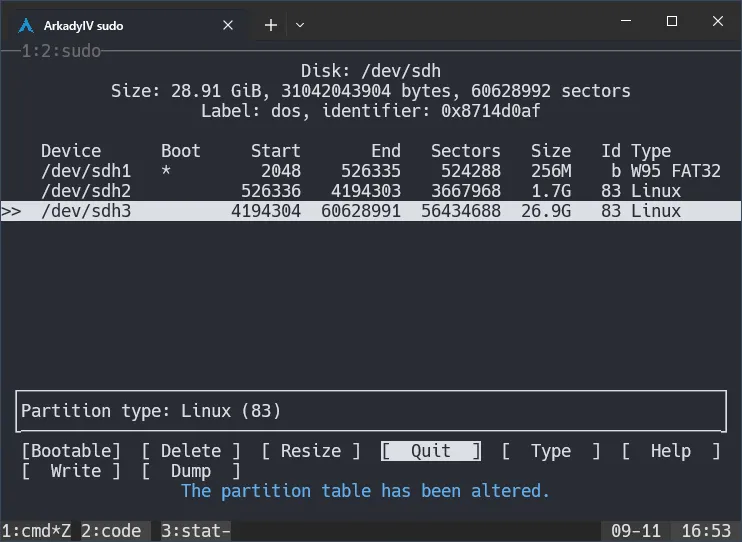
Highlight "Quit" and press Enter or just press "q" on your keyboard to exit cfdisk. Run sync then remove the SD card and insert it back into the Raspberry Pi.
Now the partition is ready. Later we'll create a filesystem on it and configure it to mount at boot.
Continue to First Boot.
§Windows
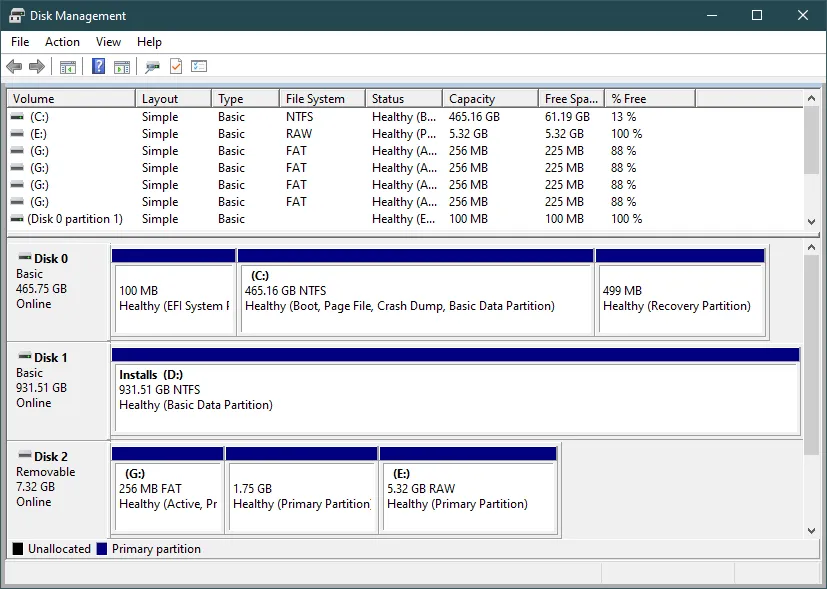
Under Windows we'll use Disk Management to create a new partition. Hit Windows key + R and type Diskmgmt.msc to launch it:
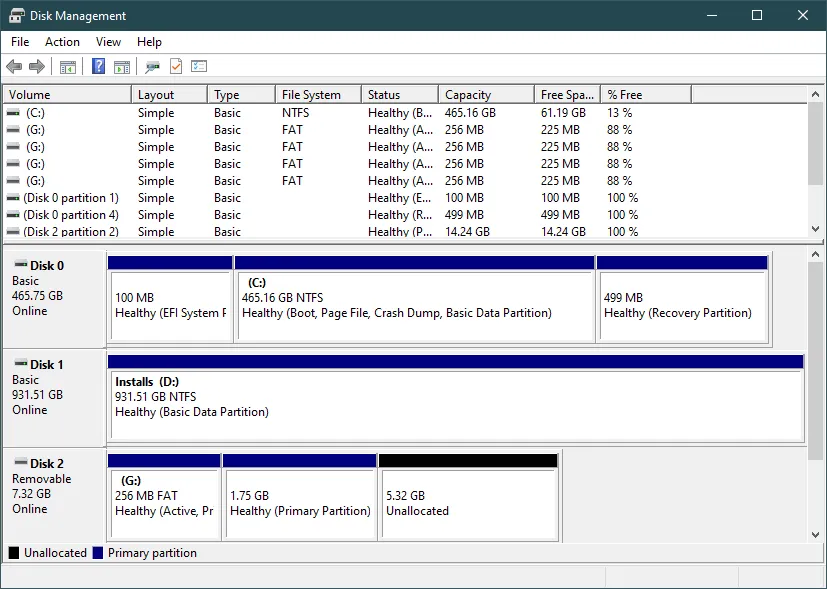
In my case my SD card is Disk 2, with 5.32GB of unallocated space. Find your card and right click the "Unallocated" space at the end of it:
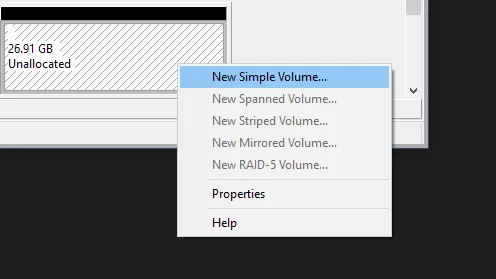
Click "New Simple Volume". Click Next three times until you get to the "Format Partition" screen. Select "Do not format this volume":
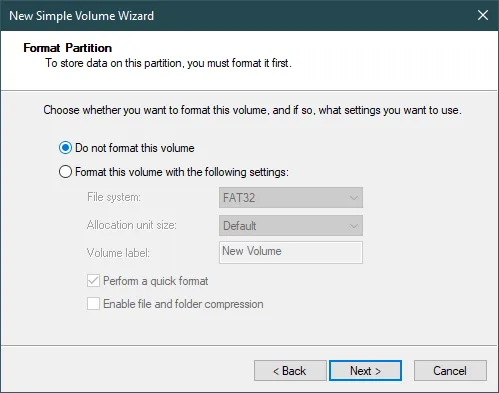
Click Next and then Finish. After a moment you should see something like this:
Eject the disk and remove the SD card, then insert it back into the Raspberry Pi.
Now the partition is ready. Later we'll create a filesystem on it and configure it to mount at boot.
§First Boot
Now insert the SD card into your Raspberry Pi and boot it. If it succeeds, congratulations. You've installed Void Linux. The live system is your installation. Continue below to configure it.
§Configuration

§Working With the System
To work with the new Void Linux system, you can either connect a monitor and keyboard to the Raspberry Pi, or connect to it via SSH. Void runs an SSH server by default which accepts passwords. In either case you can login as root using the password voidlinux.
§Basics
Perform a system update with xbps-install -Su. Be sure to run this occasionally to keep the system up to date.
Note that Void comes with vi as its text editor. If you would prefer to use something else, install it now. For example, to install nano: xbps-install nano
Edit /etc/hostname with your hostname of choice (I'll be using Mucor; be sure to change that where you see it)
Now edit /etc/rc.conf. We need to set our keymap here. You can find available keymaps under /usr/share/kbd/keymaps. For many qwerty keyboard users, us will be sufficient:
KEYMAP="us"
We also need to set our timezone in /etc/rc.conf. You can find available timezones in /usr/share/zoneinfo. Find yours and adjust the following command:
ln -sf /usr/share/zoneinfo/EST /etc/localtime
You can configure your locale in /etc/locale.conf. The default settings are sufficient for me:
LANG=en_US.UTF-8
LC_COLLATE=C
Run locale -a to see available locales. However, these are a bit limited by default. If you need something else, edit /etc/default/libc-locales and uncomment any locales you need, then run xbps-reconfigure -f glibc-locales.
You should find and take note of the block device representing the SD card. It will probably be /dev/mmcblk0, but run lsblk to double check. This guide will use /dev/mmcblk0, be sure to change it if necessary.
§Storage Partition
Now we'll finish preparing the storage partition we created earlier. We'll start by creating an ext4 filesystem on it:
mkfs.ext4 -L "Mucor-Storage" /dev/mmcblk0p3
We'll mount this at /mnt/storage:
mkdir /mnt/storage
mount /dev/mmcblk0p3 /mnt/storage
Now we need to add the partition to our fstab so it will mount on boot. We'll need to know its UUID for that, so we'll use lsblk to find it:
lsblk -o PATH,UUID
# PATH           UUID
# /dev/loop0     f3cd6547-f95a-46b8-91fd-9c9d819cd979
# /dev/mmcblk0
# /dev/mmcblk0p1 8382-5862
# /dev/mmcblk0p2 6557fbc9-8415-45b0-9a8d-92463bf670b1
# /dev/mmcblk0p3 2acef3cd-f95a-46b8-91fd-9c9d8b9cd979
Here we see that the (filesystem) UUID of /dev/mmcblk0p3 is 2acef3cd-f95a-46b8-91fd-9c9d8b9cd979.
Now edit /etc/fstab and add the storage drive with a line like this (use your own UUID!):
UUID=f3cd6557-f95a-46b8-91fd-9c9d8b9cd979 /mnt/storage ext4 defaults 0 2
We'll also add a bind mount from /mnt/storage/home-data to /home. This way any data stored in your home directory will be located on the storage partition, preserving space on the root partition. You can do the same with any other directories that might be taking up too much space. Enter a line like this:
/mnt/storage/home-data /home none bind 0 0
Now your fstab should look something like this:
UUID=fbc92ace-8415-45b0-9a8d-92463bf670b1 / ext4 defaults 0 1
UUID=8862-3825 /boot vfat defaults 0 2

# Storage partition
UUID=f3cd6557-f95a-46b8-91fd-9c9d8b9cd979 /mnt/storage ext4 defaults 0 2

# Bind mounts
/mnt/storage/home-data /home none bind 0 0
Run mount -a to ensure everything is mounted. The storage partition is now ready!
§User Configuration
Now we'll configure our users. We need to give root a better password and create an admin user that we'll login as in the future.
Since we're already logged in as root, run passwd and follow the prompts to change the root password.
You may also want to give root a better login shell. Run chsh -l to see available shells. Run chsh -s /bin/bash to use bash, for example.
Next we'll create our admin account. The following command will create a user named nn with zsh as its login shell. Adjust it accordingly (and run xbps-install zsh if you do want to use zsh):
useradd -m -G wheel -s /bin/zsh nn
Now run passwd nn and follow the prompts to set a password for the account.
Run visudo -f /etc/sudoers.d/010_admin and write the following line into the file:
%wheel ALL=(ALL:ALL) ALL
This will allow users in group wheel (such as nn) to run any command via sudo, after providing their password.
§SSH Configuration
In this section we'll secure our SSH configuration and authorize ourselves to login to our admin account via SSH. If you don't plan on using SSH, just run sv down sshd to disable the server.
We'll be disabling password logins completely and instead rely on SSH keys for greater security. First we'll authorize ourselves to login to the admin account. Do the following:
# Switch to our admin user and create a .ssh directory in the admin's home directory
su nn
cd
mkdir .ssh
Now edit .ssh/authorized_keys and paste in the public key you'd like to login with. Now we need to correct permissions:
chmod 600 .ssh/authorized_keys
Now run exit to return to the root user.
Now we need to secure our SSH server a bit. Edit /etc/ssh/sshd_config.d/010_restrict.conf. Add the following lines:
# Let's use a less obvious port
Port 22022
# We don't need to login as root, our admin can use sudo
PermitRootLogin no
# Password authentication is insecure; disable it
PasswordAuthentication no
Now we need to restart the sshd server for these changes to take effect. Run sv restart sshd. My ssh connection survived the restart, but now is as good a time as any to log out of root and re-connect as nn with our public key.
Type exit to return to your host machine. Now type ssh -p22022 nn@192.168.1.23. If this works then you're done configuring users and can login as your admin user from now on.
§Security
Security is somewhat beyond the scope of this guide, but we will set up a basic firewall with UFW. Install UFW:
xbps-install ufw
We'll allow connections from inside our LAN only. You'll need to know where your router assigns addresses; this guide will use 192.168.1.0/24. Do the following:
# Deny all incoming connections
ufw default deny
# Except from inside our LAN
ufw allow from 192.168.1.0/24
# Start our firewall and set it to start at boot
ufw enable
ln -s /etc/sv/ufw /var/service/
If you want to login to the system with SSH from outside the network, run:
ufw limit 22022
This will rate limit (external) SSH connection attempts for additonal security.
§Finishing Up
You should now have a minimal, functional Void install on your Raspberry Pi, ready for you to build on. I plan to write more guides around Void Linux in the future, including one on ROOTFS installs.
For now, see my Void Cheatsheet for useful commands and packages to install.
Good luck! 🚀
§History
- Edited 2024-09-15 to correct typo and better reflect best practices in configuring
sudoandsshd.